Introduction
This quick start guide is a resource for phoenixNAP (PNAP) clients using the Veeam Service Provider Console (VSPC) operated by PNAP. It provides the required information for a user to log in to VSPC and configure the necessary software components to manage, create, and restore backup data for protected workloads.
Note: This guide uses the Veeam Service Provider Console version 7.0.
Veeam Service Provider Console Overview
Veeam Service Provider Console provides off-site access and management of your cloud repositories from a centralized environment. The VSPC platform is central in supporting Veeam disaster recovery and backup services.
It provides three DRaaS restore options:
1. System-level. Bare-metal restore your entire system to the same or different hardware.
2. Volume-level. Restore a failed hard drive or corrupted partition.
3. File-level. Restore individual files from any backup file in minutes.
Supported BaaS backup options include the following:
1. Volume level backup.
2. File-level backup.
3. Windows. Full Standalone/Full active/Full Synthetic/Full backups + incremental backups.
Veeam Service Provider Console (VSPC) Login
The Veeam Service Provider Console (VSPC) is a cloud-based management and monitoring solution for administering your Veeam data protection operations. To log in to the Veeam Service Provider Console operated by phoenixNAP:
1. Using a web browser, navigate to the VSPC login page. Use one of the following URLs:
- Phoenix, Ashburn, Atlanta: https://us.vspc.phoenixnap.com
- Netherlands: https://eu.vspc.phoenixnap.com
- Singapore: https://apac.vspc.phoenixnap.com
Note: For resellers, the site shows as CID_LOCATION during company creation. For example: PNAP-PHX.
2. Enter your Username and Password in the corresponding fields. Your credentials will be provided by phoenixNAP. The username will be in the following format: company_nameVSPC- clientID_location
3. Click Login.
Important: All provided usernames that do NOT follow the above-mentioned standard will be blocked. Initially, the system will display a server is not responding error message.
Veeam Management and Backup Agents
To manage Veeam Backup Agents in the Veeam Service Provider Console, you need two software components on the machines you intend to protect:
- Veeam Backup Agent. This software component protects your computer's data and manages restore operations. By running discovery rules, you identify the machines in your network on which you can install Veeam Backup Agents. Deploy agents to configure backup jobs.
- Veeam Service Provider Console Management Agent. This software component is the connecting piece between the Veeam Backup Agent and the Veeam Service Provider Console. Through it, admins give out commands from the VSPC to the Veeam Backup Agent, effectively executing all operations on a managed computer, collecting data from the computer, and sending it back to the Service Provider Console.
Below are the necessary steps to protect and manage your backups with the Veeam Service Provider Console:
1. Install and configure the Veeam Master Management Agent for Linux, Windows, or macOS.
2. Configure discovery rules and identify machines.
3. Install Veeam Backup Agents.
Download and Install the Master Management Agent
To download the Veeam Master Management Agent, select Managed Computers from the menu bar on the left, then click Download Agent. This will allow choosing the Veeam Master Management Agent to download for Linux, macOS, or Windows.
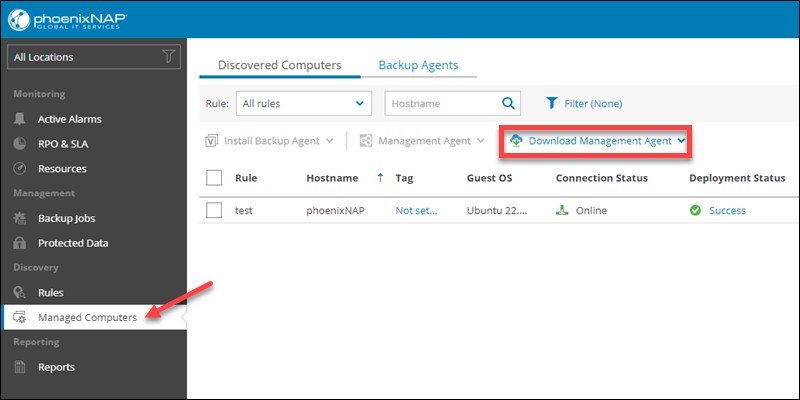
As you can see in the image above, the Install Backup Agent option is available once you download and install the management agent. If you manually install the Backup Agent before installing the Management Agent, you will NOT be able to configure a backup to a Veeam Cloud Connect repository.
1. Select Download Agent. Choose the OS and wait for the process to complete.
2. Run the downloaded Management Agent app file as an administrator. For Linux, use the following command:
sudo bash ./LinuxAgentPackages.[company_name].shChange the shell type if not using Bash.
3. Once installed, run the Veeam Management Agent. On initial setup, you'll need to configure the following parameters:
| Field | Description |
|---|---|
| Cloud Gateway | A FQDN of a PNAP cloud gateway. Depending on which location you are using, enter one of the following: Phoenix: phxcloudconnect.phoenixnap.com or phxcloudconnext2.phoenixnap.comAshburn: ashcloudconnect.phoenixnap.comNetherlands: nldcloudconnect.phoenixnap.comAtlanta: atlcloudconnect.phoenixnap.comSingapore: sincloudconnect.phoenixnap.com |
| Port | The port used to transfer backups to and from cloud repositories. Set to 6180. |
| Username and Password | The client username and password are provided by PNAP in your welcome email. |
| Security Certificate | The security certificate will be downloaded and verified automatically. |
| Remote computer discovery user account (Optional) | Specify an account used for remote computer discovery and installation of Veeam backup agents. You can specify the user account while creating a discovery rule if not configured now. |
Follow the installation wizard for Windows and fill out the required fields according to the table above.

For Linux, use the following command to configure the Management Agent:
sudo veeamconsoleconfig -g add [gateway]:6180 --validate_cert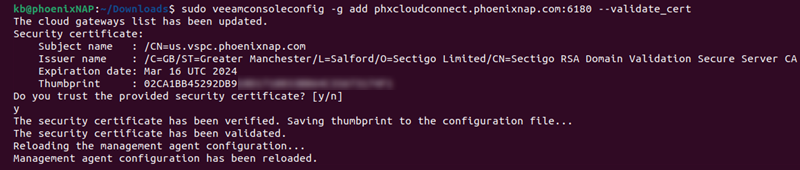
Use one of the provided gateways from the table above and press y when asked to verify the certificate.
If configuring the Remote Computer Discovery user account from the Windows installation wizard, the account must have administrator privileges on the machine where the Veeam Backup Agent will be installed.
To specify an account for remote computer discovery:
1. Select the Not set… link in the Remote computer discovery user account field.
2. Check the Specify local administrator credentials for the remote computers checkbox.
3. Type in the Username and Password of an existing account. The username must be in the company\username format.
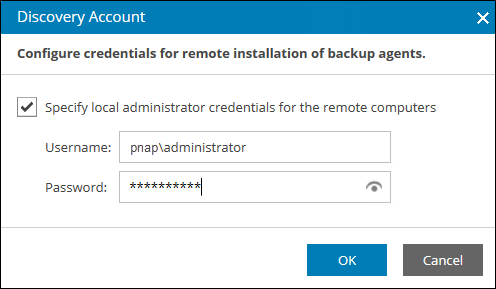
When finished, click OK.
Important: The remote computer discovery user account and its credentials defined in the Master Management Agent take precedence over credentials specified in a discovery rule. The Master Management Agent will always primarily use the account specified in its configuration settings.
If the account is not defined or not valid, only then will the Master Management agent use an account specified in a discovery rule.
When you enter the necessary information, click Apply. The management agent is now configured to communicate with the Veeam Service Provider Console. In the displayed window, select Yes to restart the Veeam Management Agent. The agent will attempt to connect to VSPC.
The Agent Status field will display whether the management agent is connected.
Install Veeam Backup Agents
Backup Agents can be deployed automatically or manually. The recommended installation procedure is using Discovery Rules. This method initiates the installation within the Veeam Service Provider Console with minimal manual steps.
To install Veeam Backup Agents with Discovery Rules:
1. Install and set up the Master Management Agent on a computer in your infrastructure.
2. Run a Discovery Rule.
3. Start the installation of Veeam Backup Agents in the VSPC.
Refer to the Configuring Discovery Rules section for detailed instructions.
General Use Case – How to Protect Multiple Windows Computers
Consider the use case in which multiple Windows machines are on a single network, and you want to protect them via VSPC. Ensure the prerequisites below are met before configuring a discovery rule for this use case:
- Master agent deployed on a Windows machine.
- Remote computers you intend to protect must all be Windows machines.
- The Windows Management Instrumentation (WMI-In) firewall rule must be configured to allow inbound traffic.
- Machines must be powered on and configured to allow network discovery.
- The Remote Scheduled Tasks Management (RPC) firewall rule must allow inbound traffic.
- When automatically deploying Veeam Backup Agents, ensure that the File and Printer Sharing (SMB-In) firewall rule allows inbound traffic.
Configuring Discovery Rules
Please note that the Discovery Rules settings outlined below may not suit your situation, and you might need to configure other Discovery Methods. Please refer to Veeam: Deployment and Management with Discovery Rules for additional configuration instructions.
To configure a Discovery Rule, select Rules from the menu on the left and click New.
1. Rule Name. Enter a descriptive name. Click Next.
2. Locations. Select the company location. There must be at least one master agent installed. Otherwise, you will not be able to get past this step. Click Next to proceed.
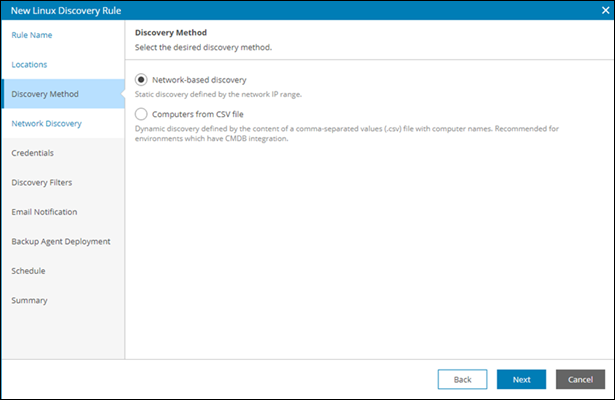
3. Discovery Method. Veeam Service Provider supports the following discovery methods (2 for Linux and 3 for Windows):
- Network-based discovery. A discovery rule governed by the network IP range, recommended for smaller environments without an Active Directory domain. This is a good option for our use case because the Management Agent will have network access to all other machines.
- Computers from CSV file. The comma-separated values (.csv) file content governs the dynamic discovery and is recommended for environments with CMDB integration.
- Active Directory discovery (Windows). Dynamic discovery is governed by Active Directory containers and recommended for Active Directory domain environments of any size.
4. Network Discovery. To complete this step, define one or more IP ranges and networks that should be scanned to discover computers. For multiple IP ranges, repeat the steps below for each IP range you want to define:
- Click Add.
- Enter a descriptive network name.
- Define the network's IP range.
5. Credentials. Define account credentials that the Master Management Agent will use to connect to computers it discovers in the network. The account used must have Administrator privileges on all discovered computers.
If you have previously specified a discovery agent in the Master Management Agent, select the Use credentials specified in the master management agent configuration checkbox.
6. Discovery Filters. Select what filters to enable for discovery. The following filters are available:
- By OS type.
- By application.
- By platform.
7. Email Notification. During this wizard step, you can configure email notifications about discovery results.
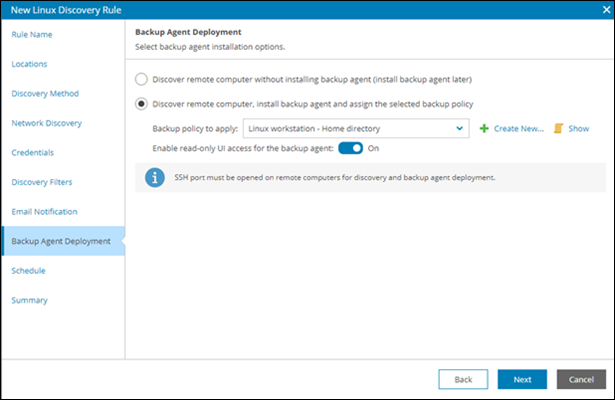
8. Backup Agent Deployment. Choose whether to deploy Veeam Backup Agents on all discovered computers. Choose the backup policy to apply or create a new policy. By default, read-only UI access is enabled for all backup agents.
For more details regarding enabling read-only access, please refer to Veeam: Enabling Read-Only Access Mode.
9. Schedule. The scheduling page allows running the rule automatically daily, monthly, or periodically.
10. Summary. Review your settings on this page:
- Click Back to return to any of the previous steps.
- Select the Launch the discovery rule when I click Finish checkbox to start the discovery rule. You can run the discovery rule later if you opt to unselect this option. To do so, navigate to Rules, select the discovery option in the list, and click the Run link in the top bar.
- Click Finish to complete rule creation.
Automatic Installation Process
The automatic installation triggers if the Discovery Rule is launched immediately.
The installation runs as follows:
1. The Master Management Agent downloads the Veeam Backup Agent installation file and transfers this file to all discovered computers.
2. The Master Management Agent downloads the Veeam Management Agent installation file over the internet and transfers this file to all discovered computers. The management agent is installed on all computers and configured to communicate with the VSPC.
3. The installed Management Agents trigger the installation of Veeam Backup Agents. Once installed, the backup agents are run on all remote machines.
4. When backup jobs need to be set up as part of the installation, the Management Agent applies a backup policy.
Managed Computers
All discovered machines can be found in Managed Computers under the Discovered Computers tab. You can check whether a Backup Agent was installed on each machine there. If not, you can select a machine in the list and manually start the installation.
Select a machine from the list and select Install Backup Agent.
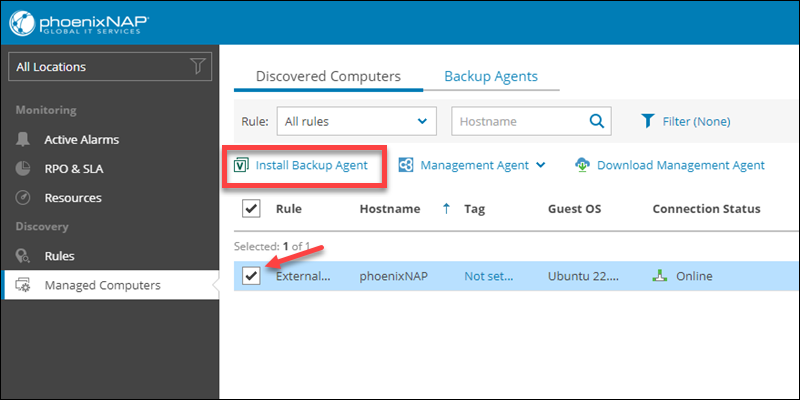
If the Install Backup Agent option is unavailable, it may mean that an agent has already been installed or that the machine is powered off.
Overview of the Veeam Service Provider Console
Apart from setting up master management and backup agents, the Veeam Service Provider Console enables monitoring and tracking service resources. Below is a quick overview of the other pages available in the VSPC portal.
Active Alarms
The VSPC includes a set of alarms with predefined rules. Depending on your use case, you can customize predefined alarm rules.
For a list of predefined alarms, see Veeam Predefined Alarms list.
By default, the system is preconfigured to send email notifications to the Company Administrator. You can also configure an alarm response action to send email notifications to other users.
Please note that there are four (4) severity levels, color-coded as seen below:
Please note that there are four (4) severity levels, color-coded as seen below:
| Severity Level | Description |
|---|---|
| Error (RED) | A critical error that requires immediate action. |
| Warning (YELLOW) | A non-critical error that needs your attention. If not catered for, it may cause a critical error. |
| Resolved (GREEN) | An issue that was resolved. |
| Information (BLUE) | General information on a specific event. |
Resources
The Resources page shows cloud resource consumption for the company. The page contains a dashboard with two views:
- Backup. Shows the storage and transfer quotas for Veeam Cloud Connect resources.
- Replication. Shows the Veeam Cloud Connect replication resources, including the CPU ratio, memory, and storage.
Reports
Run and set up backup reports to test the efficiency of data protection. The VSPC enables you to generate backup reports and send them via email to the Company Owner. Create a schedule for automatic report generation and notification. This functionality is available by selecting Reports in the menu on the left.
For more details on configuring, running, and managing backup reports, please refer to Veeam: Backup Reporting.
PhoenixNAP Use Cases for Veeam Service Provider Console
PhoenixNAP provides the Veeam Service Provider Console and Veeam Agents Backup for physical and cloud servers and workstations (endpoints). The three most general use cases are:
1. Backup within the same PNAP facility.
2. Backup to a different PNAP facility.
3. Backup to multiple PNAP facilities from on-premises or third-party.
Use Case #1 – Backup Within the Same PNAP Facility
- Bare Metal server backup.
- Colocation / Hardware-as-a-Service backup.
- Back up to a repository within the same location/facility.

Use Case #2 – Backup to a Different PNAP Facility
- Bare Metal server backup.
- Colocation / Hardware-as-a-Service backup.
- Back up to a repository at a different PNAP facility.

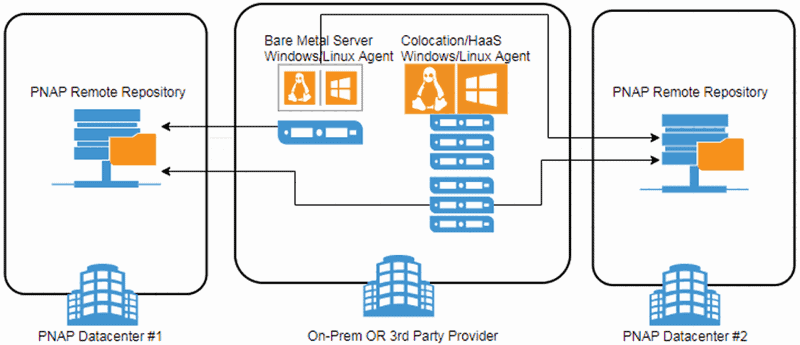
Use Case #3 – Backup to Multiple PNAP Facilities from On-Premises or 3rd Party
- Bare Metal servers backup.
- Colocation / Hardware-as-a-Service backup.
- Back up to a repository in multiple PNAP locations/facilities.
Conclusion
By following the steps outlined in this article, you should now be able to set up a basic configuration to manage your resources in the Veeam Service Provider Console.
For a detailed user guide, please refer to Veeam's official Veeam Service Provider Console Manual.
