Introduction
The SSH protocol is used for private machines, in data centers, and by nearly every major enterprise to connect to remote servers.
Businesses often rush to establish their infrastructure and may skip essential security measures in the process. Whether you are building a new server or a virtual machine, it is good practice to implement multiple security layers within your environment.
Learn and implement 5 essential SSH security practices to protect your SSH connections and servers.
Prerequisites
- A user account with sudo privileges.
- Access to a terminal window/command line.
- A remote server with network access.
- SSH enabled on the remote server.
Secure SSH: 5 Best Practices
Combine security measures and apply them in layers. Do not pick just one and rely on only that solution.
Changing the default SSH port, using SSH key pairs, and following the other recommended best practices can significantly improve your system's overall security.
1. Change the Default SSH Port
Most automated attacks target IP addresses on the default SSH port 22. Since many SSH server exploit scripts run continuously, the load on your server may increase substantially.
Using a non-standard port number for an SSH connection helps avoid these attacks.
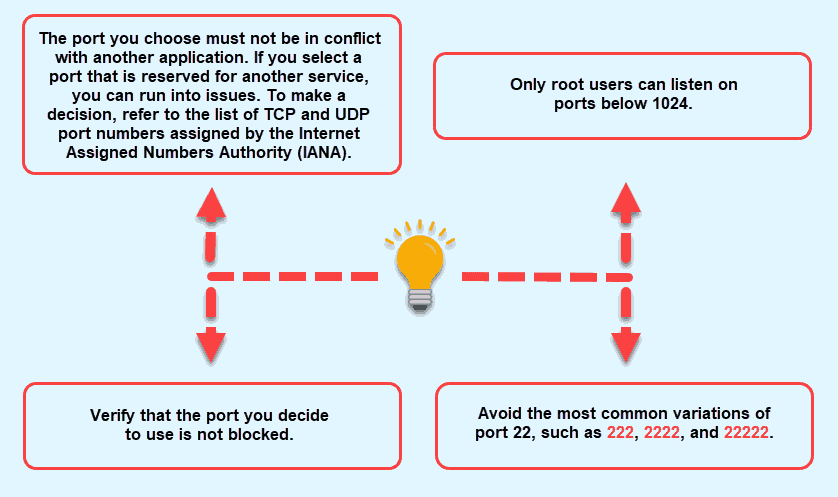
It is important to note that changing the default SSH port does not prevent cyber attacks, but it does make servers a less obvious target.
Note: One easy way to test this is to let your server run for a few days with sshd listening on the default port and then change it to a non-standard one. Compare the number of failed logins on your server, and you will see it decrease substantially.
To change the port on a Linux server, follow these steps:
1. Connect to the remote server via SSH.
2. Use a text editor, for example, nano, to edit the ssh configuration file located in the /etc/ssh/ directory. Enter the following command to open the sshd_config file with root privileges:
sudo nano /etc/ssh/sshd_configAdjust the command if the file path differs on your system.
3. Locate the line that says Port 22. Change the port number to the desired value. Ensure there is no # at the beginning of the line, which would comment out the setting.
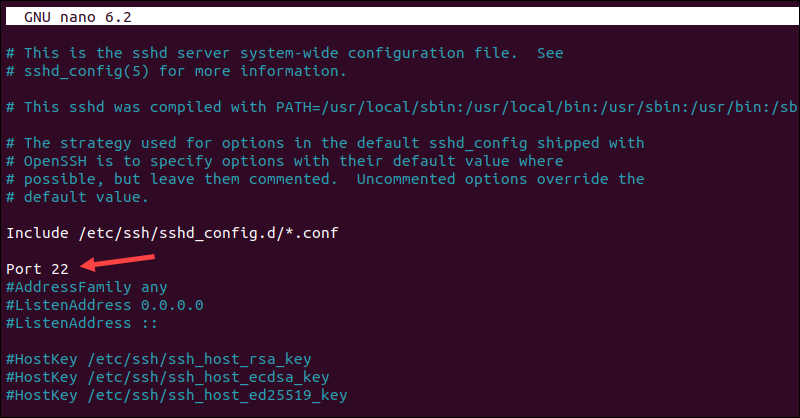
4. Exit the editor and save the changes.
5. To apply the changes, restart the sshd service with the following command:
service sshd restartVerify that SSH is listening on the new port by attempting to connect to it. Moving forward, you will need to specify the new port when connecting, as the client defaults to using the standard SSH port unless otherwise instructed.
Benefits
By using a non-standard port for SSH, you:
- Avoid being detected by random scans.
- Make it more difficult for attackers to find your server. Most attacks target the default port, and attackers often move on if they cannot establish a connection.
- Reduce server load and keep log files lean since the SSH daemon receives fewer connection requests from scripted attacks.
- Receive fewer alerts for failed logins, which means fewer false alarms. If attempts are made on a non-standard port, it likely indicates a targeted attack.
- Lower exposure to hacks resulting from SSH daemon bugs or weak private keys.
- Sway attackers when they see that the server is not using the default port. This is a sign that the server is protected and that other security measures have been taken, making your server an undesirable target.
Drawbacks
The disadvantages of running a non-standard port include that:
- Anyone who needs to connect to the server must be informed of and use the new port.
- If you use a managed security service provider, you must also inform them of the change. Otherwise, they may view this as a potential threat, which could lead to server downtime.
- Firewall rules related to the SSH service must be inspected and modified according to the changes.
2. Enhance Linux SSH Security Using Key Pairs
Strong passwords may be sufficient to keep a server safe, but persistent brute-force attacks can still crack them. This is why you need additional SSH hardening with key pairs.
SSH keys are resilient to such attacks and are virtually impossible to decrypt. An SSH key pair consists of two long series of characters: a private key, which is kept secret, and a public key, which can be safely shared.
The keys allow users to automatically establish an SSH session without the need to type in a password.
To set up SSH keys, generate a key pair on the client computer, which is used to connect to the server:
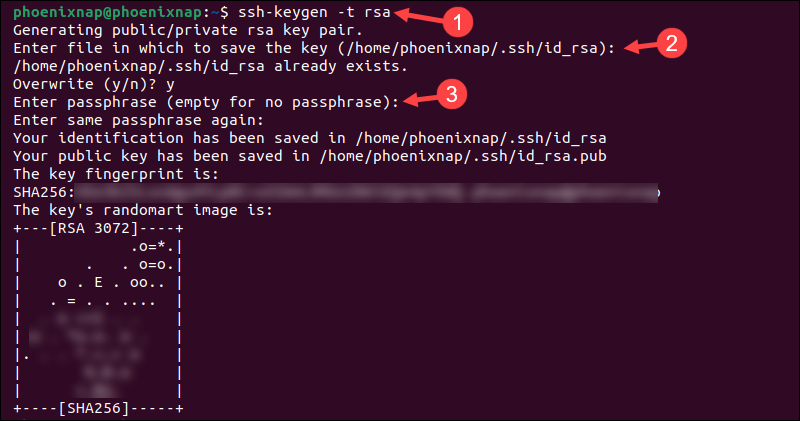
1. Access the terminal and use the following command to run the SSH keygen utility:
ssh-keygen -t rsaThe utility is available with the standard OpenSSH tool. You can make the authentication/authorization even more secure by creating larger 4096-bit keys instead of the default 2048 bits. To do so, append -b 4096 to the ssh-keygen command:
ssh-keygen -t rsa -b 40962. The message Generating public/private RSA key pair appears. To save the key to the default location, press Enter when prompted. The key will be saved in the home user's directory, in the ~/.ssh directory.
Note: To change the location, type in the new path. The recommendation is to stick with the default location so you do not have to make any changes to your SSH client.
The private, or the identification key, will be saved as id_rsa and the corresponding public key as id_rsa.pub.
Note: Learn more about Rivest-Shamir-Adleman (RSA) encryption.
3. Optionally, insert a passphrase. If you do not wish to use one, press Enter to continue. The passphrase provides an additional security layer by encrypting the private key on the local machine.
Note: To compromise the passphrase, a hacker would need to access your system first, as the private key is not exposed to the network. Even then, it will take significant time to break in, allowing you to change the compromised key before any further access is gained. The downside is that you must enter the passphrase each time you connect using that key.
4. To use the key pair for SSH authentication, place the public key on the desired server. The simplest way to do so is to use the ssh-copy-id tool available with OpenSSH. Enter the following command:
ssh-copy-id username@your_host_addressWhen connecting for the first time to this host, the system displays an authenticity message. Type Yes to continue.
5. When asked, input the password, and the tool will copy the contents of the ~/.ssh/ id_rsa.pub key to the authorized_keys file under the ~/.ssh home directory on the remote server.
Note: No characters will be visible while you are typing the password due to security reasons.
The public key has been placed on the remote server, and now you can log into it without entering the account's password.

6. To test if SSH authentication with the keys works, connect to the server with:
ssh username@your_host_address If successful, you will be automatically logged in. Users who have previously set up a passphrase must enter it before being granted access to the server.
3. Disable Server SSH Root Login
Linux server distributions have external root access enabled by default. This can be a severe security threat since hackers can try to crack the password with brute force attacks. It is recommended to disable root login and use a regular user account with sudo privileges to elevate to root when necessary.
Before you disable the root login, ensure that you have added a user account that can gain root access by following these steps:
1. Use SSH to log into the remote server as root.
2. Use a text editor to open the main configuration file:
sudo nano /etc/ssh/sshd_config3. Find the line that says PermitRootLogin yes and change it to PermitRootLogin no.
4. It is essential to ensure that your user account can log in. Add a line for your username if it's not already present:
AllowUsers your_username_here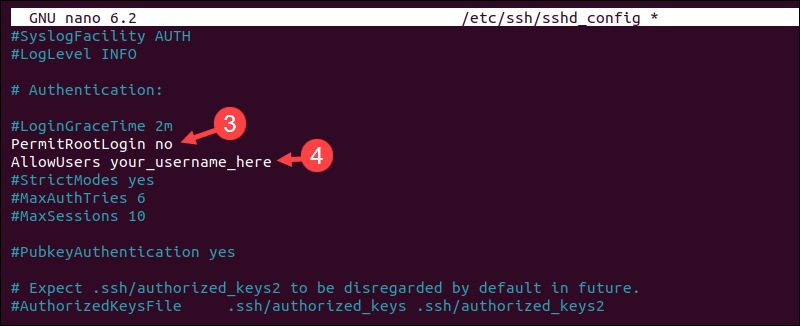
5. Save the changes and exit the text editor.
6. Restart the SSH service, but do not close the root session yet:
sudo systemctl restart sshd7. Open a new terminal window and verify that you can log in with the new user account.
Make sure to test the new login configuration before logging out of the root session to avoid being locked out of the server due to a misconfiguration. Once you confirm it works, exit the active root session.
4. Disable Password-Based Logins on a Server
If you use SSH keys for SSH authentication, consider disabling server password authentication to protect the server from brute-force attacks. Before proceeding, double-check if SSH key-based authentication is working correctly, either for the root account or for an account with sudo access.
Complete the following steps to set up passwordless SSH logins:
1. Use SSH keys to log into the server with sudo privileges.
2. Use a text editor to open the sshd_config file:
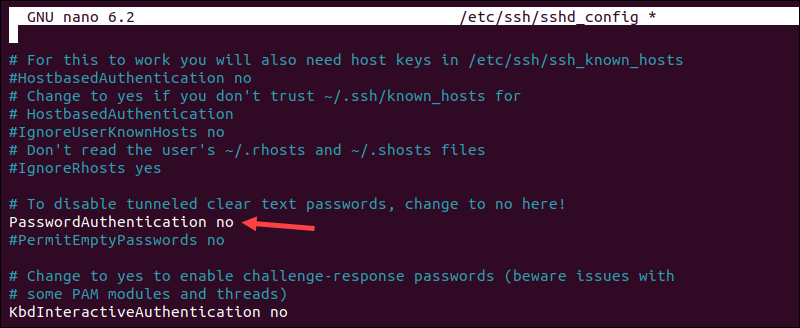
sudo nano /etc/ssh/sshd_config3. Look for the line that says PasswordAuthentication yes and change it to PasswordAuthentication no. Uncomment the line if the # is present.
4. Save the changes and exit the text editor.
5. Restart the SSH service to apply the changes:
sudo systemctl restart sshd You have successfully disabled the option to log in through SSH using account passwords. The SSH daemon will now ignore authentication requests that do not include private/public key pairs.
5. Restrict SSH Access Using iptables
Iptables is a Linux utility for configuring firewall rules and filtering incoming and outgoing traffic. It is included by default with most Linux distributions.
With iptables, you can define rules that limit or permit traffic for different kinds of services by IP address, port, or network protocol. Users can configure firewall rules to restrict the incoming SSH traffic for everyone but one IP address or subnet.
By blocking port 22, you can prevent DDoS attacks and unauthorized access to your servers.
1. Use the following command to allow an IP address for SSH access on port 22:
sudo iptables -A INPUT -p tcp -s 123.456.78.90 --dport 22 -j ACCEPTReplace the example IP in the command with the IP address you wish to allow.
Note: For more detailed output, such as packet, byte, and target information, append -v to the command. Remember, iptables commands are case-sensitive.
2. Save the rules to ensure they remain in place after reboot:
sudo iptables-save > /etc/iptables/rules.v4This is a standard command on Ubuntu systems but may vary depending on the Linux distribution. It is important to verify the appropriate method for your system.
The iptables command has numerous options, parameters, and values. The tables below list the most frequently used ones.
Chains are predefined categories in iptables that determine where rules are applied in the network traffic flow.
| CHAIN | DESCRIPTION |
|---|---|
INPUT | Controls the incoming packets. |
FORWARDS | Manages packets that are routed through the server. |
OUTPUT | Filters packets going out of the server. |
Options specify what operation to perform on the chains or rules.
| OPTION | DESCRIPTION |
|---|---|
-A | Adds a rule to the end of the selected chain. |
-I | Inserts a rule at a specific position in the chain or at the top if no position is specified. |
-D | Deletes only one specified rule from the chain. |
-F | Removes all rules within the specified chain or all chains if none is specified. |
-L | Displays all rules in the specified chain. |
-C | Checks whether a rule exists in the specified chain. |
-N | Creates a new, user-defined chain for organizing custom rules. |
-X | Deletes a user-defined chain. |
-v | Used in combination with -L to provide detailed output. |
-n | Shows IP addresses and port numbers in numeric format. |
Iptables parameters define the criteria for filtering or directing traffic within the rules.
| PARAMETER | DESCRIPTION |
|---|---|
-p | Specifies the network protocol of the packets. For example, ICMP, TCP, or UDP. |
-s | Designates the origin hostname or IP address for the packets. |
-d | Specifies the destination IP address or hostname for the packets. |
-i | Indicates the network interface through which a packet enters the server. |
-o | Defines the network interface through which a packet leaves the server. |
-j | Directs what action to take if the packet matches the rule criteria. |
-c | Sets the packet and byte counters associated with a specific rule. |
-g | Specifies a user-defined chain to jump to. |
Values in an iptables command define the action to take when a rule matches.
| VALUE | DESCRIPTION |
|---|---|
ACCEPT | Allows the packets to pass through. |
DROP | Blocks the packets. |
RETURN | Tells to skip the current chain and resume at the following rule in the previous chain. |
Conclusion
By applying the listed SSH security practices, your system can avoid common cyber attacks. However, SSH connections are only part of the security puzzle. You also need to take sensible precautions to protect your server.
Our server security tips will go a long way in helping you achieve that.
