Introduction
Deploying Kafka on Kubernetes improves distributed event streaming with container orchestration features such as scalability and fault tolerance. The integration with Kubernetes enables organizations to scale Kafka clusters on demand while maintaining high availability and reliability.
This tutorial shows you how to deploy Kafka brokers on a Kubernetes cluster.
Prerequisites
- Kubernetes installed (see our Kubernetes on Ubuntu and Kubernetes on Rocky Linux tutorials).
- kubectl installed.
- Administrative privileges on the system.
How to Set Up Kafka on Kubernetes
Kafka is a stateful application that records streaming messages from producers and stores them for consumers to use later. In Kubernetes, the recommended way to deploy stateful applications is using stateful sets, workload objects that guarantee uniqueness and ordering of application pods.
Proceed with the steps below to create and test a Kafka stateful set deployment.
Step 1: Create Project Directory
Deploying Kafka requires creating multiple Kubernetes objects using YAML files. To facilitate applying of the configuration, create a project directory to store the files:
mkdir kafkaGo to the newly created kafka directory:
cd kafkaStep 2: Create Network Policy
A network policy defines a network that an application components can use to communicate with each other. To create a network policy for Kafka, use a text editor such as Nano to generate a new YAML file:
nano kafka-network-policy.yamlPaste the following code into the file:
apiVersion: networking.k8s.io/v1
kind: NetworkPolicy
metadata:
  name: kafka-network
spec:
  ingress:
    - from:
        - podSelector:
            matchLabels:
              network/kafka-network: "true"
  podSelector:
    matchLabels:
      network/kafka-network: "true"
Save the file and exit.
Step 3: Create ZooKeeper Stateful Set
ZooKeeper is a server for distributed coordination and synchronization of cloud applications. Kafka uses ZooKeeper to track the cluster node status and maintain lists of topics and messages.
Create a YAML file for the ZooKeeper stateful set:
nano zookeeper-stateful-set.yamlPaste the YAML code below:
apiVersion: apps/v1
kind: StatefulSet
metadata:
  labels:
    service: zookeeper
  name: zookeeper
spec:
  serviceName: zookeeper
  replicas: 1
  selector:
    matchLabels:
      service: zookeeper
  template:
    metadata:
      labels:
        network/kafka-network: "true"
        service: zookeeper
    spec:
      securityContext:
        fsGroup: 1000
      enableServiceLinks: false
      containers:
        - name: zookeeper
          imagePullPolicy: Always
          image: zookeeper
          ports:
            - containerPort: 2181
          env:
            - name: ZOOKEEPER_CLIENT_PORT
              value: "2181"
            - name: ZOOKEEPER_DATA_DIR
              value: "/var/lib/zookeeper/data"
            - name: ZOOKEEPER_LOG_DIR
              value: "/var/lib/zookeeper/log"
            - name: ZOOKEEPER_SERVER_ID
              value: "1"
          resources: {}
          volumeMounts:
            - mountPath: /var/lib/zookeeper/data
              name: zookeeper-data
            - mountPath: /var/lib/zookeeper/log
              name: zookeeper-log
      hostname: zookeeper
      restartPolicy: Always
  volumeClaimTemplates:
    - metadata:
        name: zookeeper-data
      spec:
        accessModes:
          - ReadWriteOnce
        resources:
          requests:
            storage: 1024Mi
    - metadata:
        name: zookeeper-log
      spec:
        accessModes:
          - ReadWriteOnce
        resources:
          requests:
            storage: 1024Mi
Save and exit the file.
The code defines the deployment of ZooKeeper with one replica and connects it with the previously defined kafka-network. It also provides the ZooKeeper container image and reserves volume storage for the application's data and logs.
Step 4: Create Zookeeper Service
Deploy ZooKeeper service to create a point of contact between ZooKeeper and Kafka. Generate a YAML file for the service:
nano zookeeper-service.yamlCreate a YAML declaration that defines the service name and provides a port for the service to listen on:
apiVersion: v1
kind: Service
metadata:
  labels:
    service: zookeeper
  name: zookeeper
spec:
  ports:
    - name: "2181"
      port: 2181
      targetPort: 2181
  selector:
    service: zookeeper
Save and exit the file.
Step 5: Create Kafka Stateful Set
Kafka stateful set configures the number of Kafka replicas, passes the necessary environment variables into the containers, and sets up volume claim templates to enable persistent storage.
Make a new YAML file to define the stateful set:
nano kafka-stateful-set.yamlPaste the following code into the file:
apiVersion: apps/v1
kind: StatefulSet
metadata:
  labels:
    service: kafka
  name: kafka
spec:
  serviceName: kafka
  replicas: 3
  selector:
    matchLabels:
      service: kafka
  template:
    metadata:
      labels:
        network/kafka-network: "true"
        service: kafka
    spec:
      securityContext:
        fsGroup: 1000
      enableServiceLinks: false
      containers:
      - name: kafka
        imagePullPolicy: IfNotPresent
        image: bitnami/kafka:latest
        ports:
          - containerPort: 29092
          - containerPort: 9092
        env:
          - name: KAFKA_ADVERTISED_LISTENERS
            value: "INTERNAL://:29092,LISTENER_EXTERNAL://:9092"
          - name: KAFKA_AUTO_CREATE_TOPICS_ENABLE
            value: "true"
          - name: KAFKA_INTER_BROKER_LISTENER_NAME
            value: "INTERNAL"
          - name: KAFKA_LISTENERS
            value: "INTERNAL://:29092,LISTENER_EXTERNAL://:9092"
          - name: KAFKA_LISTENER_SECURITY_PROTOCOL_MAP
            value: "INTERNAL:PLAINTEXT,LISTENER_EXTERNAL:PLAINTEXT"
          - name: KAFKA_ZOOKEEPER_CONNECT
            value: "zookeeper:2181"
        resources: {}
        volumeMounts:
          - mountPath: /var/lib/kafka/
            name: kafka-data
      hostname: kafka
      restartPolicy: Always
  volumeClaimTemplates:
    - metadata:
        name: kafka-data
      spec:
        accessModes:
          - ReadWriteOnce
        resources:
          requests:
            storage: 1Gi
Save and exit the file.
Step 6: Create Kafka Headless Service
Each Kafka broker is unique, i.e., clients must connect to a specific broker to retrieve specific data. This property makes it challenging to configure Kafka using a regular Kubernetes service since services act as load balancers and cannot distinguish between pods.
The recommended solution for this problem is to create a headless service. Headless services provide direct access to pods by allowing pods to be addressed by their DNS names.
Create a YAML for the headless service:
nano kafka-service.yamlPaste the code below into the file. The clusterIP: None line tells Kubernetes that the service is headless.
apiVersion: v1
kind: Service
metadata:
  labels:
    service: kafka
  name: kafka
spec:
  clusterIP: None
  selector:
    service: kafka
  ports:
    - name: internal
      port: 29092
      targetPort: 29092
    - name: external
      port: 30092
      targetPort: 9092
Save the file and exit.
Step 7: Apply Configuration
Use the following command to apply the YAML files created in the previous steps all at once:
kubectl apply -f .The output shows which objects were created in the cluster.

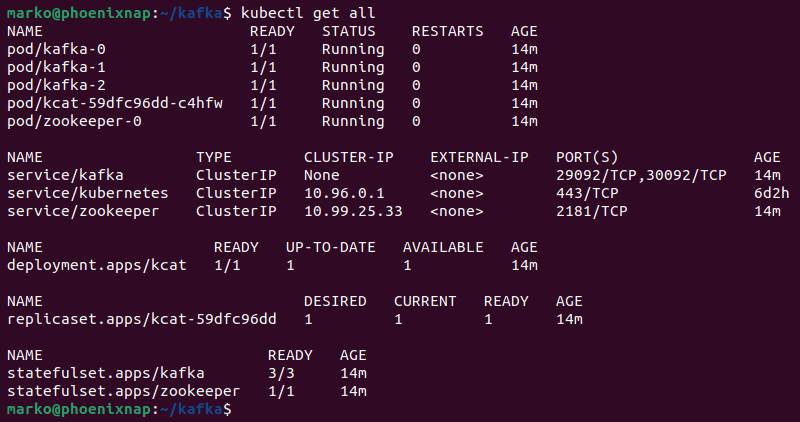
Wait for the containers to initialize, then check if the deployment is up and running by executing the following command:
kubectl get allThe output shows all the pods, deployments, replicas, and stateful sets as ready.
Step 8: Test Kafka Deployment
Test the Kafka deployment with kcat, a generic non-JVM producer and consumer application. Follow the steps below to deploy kcat and use it to test Kafka:
1. Create a YAML file:
nano kcat-deployment.yaml2. Paste the code below to create a kcat deployment:
kind: Deployment
apiVersion: apps/v1
metadata:
  name: kcat
  labels:
    app: kcat
spec:
  selector:
    matchLabels:
      app: kcat
  template:
    metadata:
      labels:
        app: kcat
    spec:
      containers:
        - name: kcat
          image: edenhill/kcat:1.7.0
          command: ["/bin/sh"]
          args: ["-c", "trap : TERM INT; sleep 1000 & wait"]
The code uses the official edenhill/kcat container image.
3. Save the file and exit.
4. Apply the manifest with kubectl:
kubectl apply -f kcat-deployment.yaml5. List the pods available in the cluster:
kubectl get pods6. Find the kcat pod and copy its name.

7. Enter the pod by executing the following command:
kubectl exec --stdin --tty [pod-name] -- /bin/shThe pod shell prompt appears.

8. Enter the command below to send Kafka a test message to ingest:
echo "Test Message" | kcat -P -b kafka:29092 -t testtopic -p -1If successful, the command prints no output.
9. Switch to the consumer role and query Kafka for messages by typing:
kcat -C -b kafka:29092 -t testtopic -p -1The test message appears in the output.

Press Control+C to return to the prompt.
Creating Topics in Production Environment
The test procedure described in this step worked because the KAFKA_AUTO_CREATE_TOPICS_ENABLE variable was set to true in the Kafka stateful set declaration. It enabled kcat to accept the message as part of a topic, although the topic had not been created before.
While useful for testing, setting this variable is not recommended in the production environment. The following steps show how to create Kafka topics in production manually:
1. List the pods in the cluster:
kubectl get podsLocate Kafka pods and choose any of the pod replicas.

2. Enter the chosen Kafka pod:
kubectl exec --stdin --tty [pod-name] -- /bin/shFor example, to enter the kafka-0 pod, type:
kubectl exec --stdin --tty kafka-0 -- /bin/sh3. Execute the following to create a new topic
kafka-topics --bootstrap-server kafka:29092 --topic [topic-name] --create --partitions [number] --replication-factor [number]For example, create a topic named test with three partitions and the replication factor of three:
kafka-topics --bootstrap-server kafka:29092 --topic test --create --partitions 3 --replication-factor 3The output confirms the topic creation:

Use the created topic with kcat or another producer to organize event-driven messages.
Kafka and Kubernetes: Challenges
Using Kafka with Kubernetes has multiple benefits, especially if the organization already deploys stateful applications in the cluster. However, the following is a list of potential challenges to consider before deciding to deploy Kafka in a container environment:
- Kubernetes works best with stateless apps. While stateful applications can operate inside a cluster, running them requires administrators to give up many features that make Kubernetes popular.
- Kafka requires an entire operating system. Kafka stores the message queue data using a file system cache, which requires an OS kernel. While Kafka can run inside a container, it still needs to communicate with the rest of the OS, so it cannot benefit from containerization as a practice.
- Kafka cannot work with a single load balancer. As explained before, Kafka brokers are not interchangeable, so putting a load balancer before them results in Kafka breaking. A solution to this problem is setting up one load balancer for each broker, but this setup can create a complicated deployment when many brokers are present.
Conclusion
By following the instructions in this tutorial, you have successfully installed Kafka on Kubernetes. The article also provided a list of challenges for the successful Kubernetes deployment of Kafka.
Read our article on deploying RabbitMQ on Kubernetes to learn more about a message broker that is a viable alternative to Kafka.
